
We installed a fairly large (for an RV) completely custom solar power system all by ourselves for right around $3000. It has 660 watts of panels, 540 amp hours (~6.5 KWh) of AGM batteries, and a 3000 watt pure sine wave inverter. This should be more than enough for us to have 2 people living and working remotely full time with about 2-3 days of reserve power if it gets cloudy. It wasn’t that hard, it just required a bit of research and a lot of time.

For starters if you’re confused about all the different components I was referring to above, I recommend a Gone With the Wynns piece on the basics of solar.
When we started looking at installing solar, I took a quick look at just paying someone to install it for us but I was amazed at how ridiculously expensive it was to have someone do it for us (a comparable system would have been over $7000 from an installer). Next we looked at DIY “kits”, but I was always disappointed either with the cost considering what you got or the poor quality of components and lack of safety equipment like fuses. I have a degree that says I’m an electrical engineer, so I figured I would be able to do a custom install, get all the quality I wanted for a reasonable price. I was able to make a system I’m pretty darn happy with for a not astronomical price. It was probably more than just running a generator for power for a year, but we hate generators. They smell, they are loud, they are un-neighborly and they are expensive to run.
Below is the basic diagram of how the major components in our system go together. There are a lot of details that are missing (primarily fuses and breakers, the current measuring shunt and the temperature sensors) but this is the gist of it. We ended up needing to be a little bit more complicated that most RV systems because the inverter/charger I found was a 24 volt unit instead of a 12 volt unit, but it was dirt cheap and perfect in every other way so it ended up being worth it.

And below is what it looks like installed. I still need to clean up some of the small sensing wires but the big ones are pretty at least. In the monitor it says that we are putting 00.7 Amps (~19W @ 27V) into the batteries from the solar panels.

Let’s talk about each of the components individually. (All prices are from late 2015 to early 2016)
-
Solar Panels

This is the one area that people are right about when they say “Solar is getting cheaper all the time!” The panels themselves are indeed getting much cheaper. As little as a year ago when we first started investigating the whole RV plan, the metric for if you got a great deal was “do the panels cost less than $1.00 per watt.” And the only way you could pull it off was with giant industrial panels that we were never going to fit on our roof and then shipping was a whole other story. Small 12V panels we could use would be around $1.50-$2 per watt after shipping. Today is a different story though. You can buy them on Amazon for $1.30 per watt and I was able to find four smaller 165 watt panels (660 W total) that would fit on our roof for a total of $670 shipped to our door ($1.02 per watt). They are listing on their site for a little higher but I just called them up and said “I’m getting quotes, what’s the best you can do for four of those panels shipped to Denver?” and they came back with a great price. – $670
-
Solar Charge Controller

We bought a Bogart Engineering SC-2030 on the recommendation of Handy Bob Solar. Handy Bob writing is very “passionate” and can be very hard to follow, but he knows his stuff about solar on RVs. I’ll be sure to make our own review of the unit after we get some more use out of it. It also needed a temperature gauge for the batteries – $130 + $12.50 = $142.50
-
Batteries
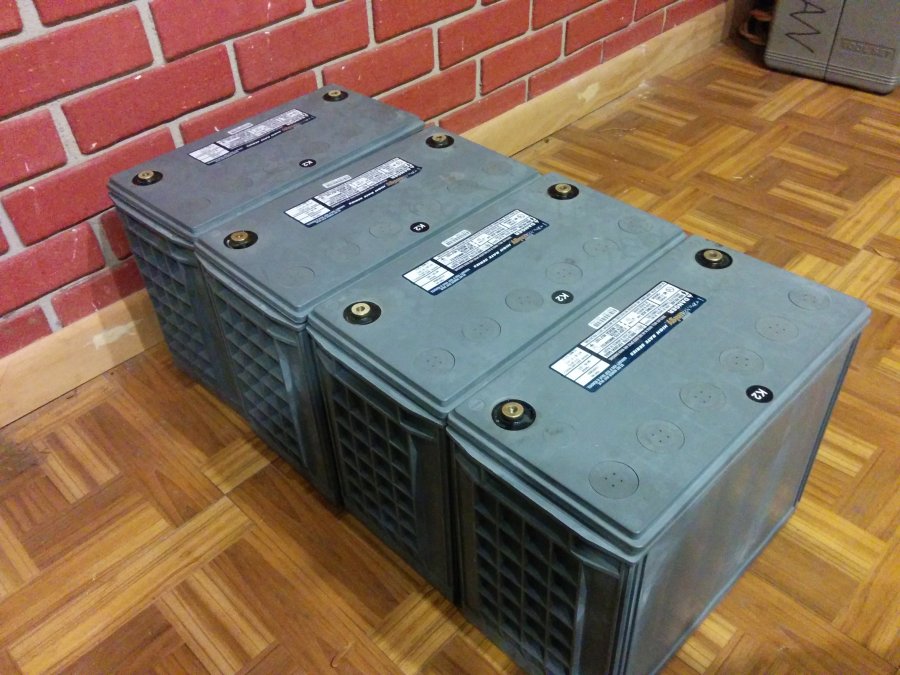
Granted you’ll want batteries even if you do just use a generator, but with solar they are a requirement. I got ours from craigslist for a song after some negotiation. I got four brand new 135 amp hour 12V AGM lead-acid batteries for $100 each. They retail for $330+ each so it was a fantastic deal. We thought about lithium batteries which compared to lead-acid batteries are lighter and smaller per amp hour, don’t have odd charging profiles so they charge much faster, can be discharged further without causing permanent damage and don’t release explosive gas if you screw up charging them (I only messed that up once); all of which would be good features in an RV. The problem is cost. If you want to go for lithium batteries like the Wynns or Technomadia, a similar amount of usable storage would cost close to $3000 at least plus shipping. I’ll keep the lead acid batteries for a while, thank you very much – $400
-
Inverter/Charger

Inverters take the DC power stored in the batteries and convert it into AC power for your standard house outlets. You can also get integrated inverter/chargers that combine the inverter with the battery charger you’d use to charge your batteries from a hookup or generator. This is usually going to be one of the most expensive components in your system, especially because you often get what you pay for in terms of quality and longevity. You can save money by getting a “modified sine wave” inverter but those generally don’t play nice with electronics like our laptops so it wasn’t an option for us. You can also save money by getting one with a lower peak output but you’ll need to base it off of your expected usage. For us, we wanted to be able to run a microwave or hair dryer plus our laptops plus a fridge and maybe even the AC for a short time, so we went for a huge 3000W inverter but if you don’t use those things in your rig, a cheap 1000W inverter might be more your style. We also really wanted an inverter with Power Boost. Long story short, power boost (also known as “hybrid” type inverters from Magnum) allows you to run your backup generator way less often, have a smaller backup generator and be a good neighbor to friends who let you borrow an outlet by preventing you from tripping their circuit breakers. Usually big 3000W inverters with power boost are $1700–$2200 but I found one on Craigslist for $900. Big win there. It was a 24V system instead of a 12V system which made things a little more complicated, but I made it work. I also ended up needing a way to change the settings on it, and while they sell a monitoring and control panel, I ended up going with the computer interface which I got used for $70. – $970
-
Battery Monitoring Kit
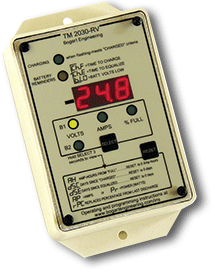
Our battery monitoring kit is a Bogart Engineering Trimetric TM-2030 that pairs with the charge controller. This measures every watt in and out of the batteries so you know exactly how charged your batteries are and how much power your charge controller can put back in. It uses a very large and very precise resistor called a shunt to measure current in and out. We got the shunt, TM-2030 and the charge controller as part of a package deal for $290 with the charge controller being $130 of that, so the rest was $160. We also got a wiring harness to hook it all together for another $21. $160 + $21 = $181
Total for the big stuff was about $2350. Now lets talk about all the rest of the little things
- Fuses, circuit breakers and shut off switches so we don’t die – fuses (2 x $36) and holder ($35) for the Inverter, fuses (2 x $8.50) and holder (2 x $15) for each string of panels, breaker for the charge controller input ($30) and charge controller output ($30), inverter shut off switch ($35) – $249
- Panel mounting hardware –
 I made my own mounts from angle aluminum and some machine screws from the hardware store. Some 3M VHB Tape and some self-drilling screws to hold them to the roof and then some Dicor sealant to make sure the roof didn’t leak where the screws made holes. I also needed screws for the battery terminals that I’ll throw in this category – about $90
 - Copper wire and connectors – Thick and thin, long and short you need copper, lots and lots of copper. And unlike the silicon in solar panels, copper is getting much more expensive all the time. 10 gauge outdoor wire for the roof ($31), outdoor connectors (2 x $7), more outdoor connectors ($9), 6 gauge wire from the roof down to the controller ($35 at Home Depot), 6 gauge connectors ($9), 2/0 gauge wire for the batteries and inverter ($63), 2/0 gauge connectors ($25), heat shrink tubing ($35) – $221
- Tools – I either owned, begged, borrowed, or stole all of the tools I needed except for a cable crimper ($35). I also needed drills, pliers, screw drivers, soldering irons, clamps, socket wrenches, and bolt cutters. – $35
So $595 on all of the extra stuff. Total cost all-in came out to right around $3000.
If you have any questions about the part selections or how it’s wired or really any part of it, feel free to reach out in the comments or via email. The information for how to do solar yourself is all out there on the internet but it isn’t exactly easy to find so I want to try to help however I can.

Nice job, but conspiracy theorist? Never made a thing up or exaggerated at all. If I reported on all of the bad installations and crap I saw, I would have a 1000 page book.
Only one suggestion: You should cover the screws on the roof completely with caulk or eventually they will cause problems from water leaking right next to them.
I must say that you know how to shop. Great deals!
The 12V power supply looks like the same one I used. It was my second… The first one didn’t last for a year due to being a pc of garbage. Could you show that and explain to people why it is needed? I get that question a lot.
Bob
LikeLike
Haha, you’re right sorry for the comparison 🙂 Good to know about the screws, I have to hop up there again to secure the wires soon, so I’ll be sure to add some more dicor. I didn’t say much about the 12V converter (this is what you’re talking about right?: http://amzn.to/1VES7if) because I didn’t think most all-12V systems needed it. In this system with a 24V battery bank I need it to step the voltage down to 12V that my lights, fridge, etc can use. Is that what you meant?
LikeLiked by 1 person
So, the only reason for the 24V switch was because you found that used inverter cheap, correct? Or is there some conversion efficiency I’m missing (not even close to an electrician here)?
LikeLike
That was pretty much it yes. The 24v inverter is 94% efficient where the 12v one is 93% efficient but that didn’t matter much. And honestly, running the batteries at 24v meant that I couldn’t really hook up the engine alternator to charge while driving so it definitely has a downside. Some people on 12v systems will put a 12v regulator where I put the converter to protect their stuff on cold days when the charge controllers are putting >15V into the batteries because of temperature compensation.
LikeLike
Granted they are not the expensive items on the list but you could probably save some more (and arguably improve the system at the same time) if, instead of BE charge controller and monitor, you’d go for Victron BMV and MPPT units (last time I checked the prices). The only thing missing with Victron controllers is temperature monitoring at the battery. In my case the temperature difference is negligible so it doesn’t matter much but I can see how it could be an issue with some other installations.
PS Just noticed they started doing all in one solutions (EasySolar and ECOMulti) with relatively attractive pricing.
LikeLiked by 1 person
Where are you finding those prices? While I’d love to have them all on the same manufacturer, I never saw the BMV for less than $150 and the MPPT controllers were all over $250? The EasySolar looked sweet but was up around $2200 from the very few places that had it in stock.
As for temperature monitoring, be careful. Lead acid batteries (even AGMs) can heat up when charging which allows them to accept more current at the same voltage, which makes them hotter, which makes them accept more current, which makes them hotter, etc. I had a runaway situation once before I set up the temperature probe and my AGMs boiled a bit and released some bad hydrogen sulfide before I noticed. Just a heads up.
LikeLike
There is a price list on their website but I guess availability (and exchange rate) in the US might be an issue. When I was looking for a battery monitor and charge controller Victron was a clear winner both in price and perfomance. I simply love how fast their development/updates are and how customizable everything is on top of all the open source user projects.
Re: temp probes. I always wondered why they stopped including them. Their old PWMs have them as an option but all the new products do without. Might send them an email some time.
LikeLike
Well I have to thank you for the information as I just sold my house and bought a older Bus conversion, I am just fixing the bad stuff that has happened over the years and Yes I am the DIY type,
I found you on HandyBobs site,
I have a lot to earn about this But that is my intent is off the grid.
Now about your 24 volt system, I am really interested in that as this bus is 24 volt starter and 225 amp alternator, Reading what you have posted has me thinking a lot.
Thanks for the info and thanks to HandyBob as well,
LikeLike
A 24V system would simplify things for me and it sounds perfect for your bus, good luck! Just so you know, I’ll probably do a review soon but given how much decent adjustable MPPT charge controllers have come down in the past year, I don’t see any reason to buy the SC-2030 anymore. It also bothers me that with my current setup I can’t see power generated by the panels separate from power in or out of the batteries as the only display is the on on the Trimetric. You can buy MPPT controllers with integrated screens (http://amzn.to/2fdWlKC) for almost the same price as the SC-2030 and still get a TM-2030 for battery state of charge.
LikeLike
Thanks Nik,, I need all the info I can get for this set up.
Terry
LikeLike
Nik,
Thanks for putting this out there for people like me. I’d say this is the #1 most helpful page I’ve found. For most helpful site I’d definitely say HandyBob’s. I agree with you that he writes “like” a conspiracy theorist. I love the way he cuts through the crap though. Shocking how much ignorance there is among those who should know better. I’m so happy for people like you and him.
After reading this I decided to look for used equipment instead of buying new. Thanks to this, I saved around $1000 on components. (I owe you a coffee or a beer, your choice :-)) I was leaning toward the Bogart controller, but after reading your above comment on MPPT I decided maybe it wasn’t as much of a waste of money as HandyBob said. I ended up with an Outback FM60 MPPT which was used in a small residential set up. I bought two of the guy’s 24v panels since I have two big enough spots on my RV roof, giving me 580 watts.
The main reason I’m posting this comment is because, like you, I ended up buying AGM batteries designed for UPS (uninterruptible power supply) installations. Mine were made by FIAMM. From the photo above I’m guessing you have Deka Unigy I 12AVR130 batteries or something similar. I’ve been doing a lot of research to make sure I configure everything right and don’t overcharge my batteries. I had to do a lot of Googling to discover that FIAMM cites 14.4 as the maximum bulk charge and not to exceed 13.62 on float. I noticed Deka recommends 13.56 max. Is that the voltage you’re using for float charge? I know overcharging on float is very bad for AGMs, but I haven’t been able to find out yet how much latitude we have with bulk. If someone knows I hope they’ll tell me.
UPS AGM’s are designed primarily for deep discharge (which quickly shortens their life) and many people say they aren’t ideal for a solar setup. I think we’ll be ok as long as we go for <%25 DOD. I decided to take the risk based on my initial research and the low cost of the batteries. After I brought them home I learned how to read the date codes and discovered that they are about 5 years old, about half their rated life. Considering the cost (about $1/Ah) I still think they were a good deal.
It looks like there are a lot of companies out there swapping out their still perfectly good used UPS batteries with new ones to keep their banks at top performance, then selling the used ones. This might be a good way for those of us who want to trim costs on our systems to get reasonably priced AGMs. Assuming that they work as I'm expecting. I've sized my battery bank about 30% bigger than I originally planned since I won't be able to discharge as much as regular AGMs. Still saves me a lot of money.
Are you sure your AGMs were new? I found a page that decodes Deka date codes. The first letter (A-M) is the month of manufacture and the second digit is the year + 2010. 2016 would be a 6.
Sorry for the length of this comment but I hope this helps someone else like your post has helped me. I wanted to ask how your batteries are performing so far. Is any of this information new to you? Also, I hope I didn't break the bad news that your AGMs weren't brand new. If they were new, I'd really like to find out where you got them. 🙂
LikeLike
Glad that these posts have been helpful. Beer sounds wonderful 🙂 As for the AGMs, I totally agree that they aren’t “ideal” for solar but they were cheap, I don’t need to worry as much about off gassing, and they have lower Peukert losses (it is less efficient to charge or discharge at high current than low current but it doesn’t affect AGMs as much) which means that I can run the microwave without worrying as much.
Thanks for the info on the date codes, I had no idea. Looks like mine were manufactured in November 2012 and I installed them in November 2015. So not as new as I hoped but I’m still not upset. I had told my charge controller that I only had 260AH of batteries instead of the 268AH they are rated to, so that was probably about right. They’ve been performing wonderfully except for one time I seriously overcharged them overnight when I was still putting pieces together and didn’t have my settings right. Whatever you do, be sure to get a temperature probe for your charge controller! In the past year, I never went below 50% but usually would let it get below about 60-70% so I’d say you’re being more conservative than you need to be with them (but time will tell, I’ve only been going for a year with mine).
As for voltages, I emailed East Penn Manufacturing (the makers of Deka) and asked for their recommendations on charging parameters and they sent me an older version of this page: http://www.dekabatteries.com/assets/base/1913.pdf and said my batteries were AGM Monoblocs. That chart put float voltage at 13.5V (27V in my system) with adjustments for temperature (26.88V – 27.12V). Use a temperature probe!!! Unfortunately the SC-2030 can’t cap voltage per mode so when it’s cold enough, the float voltage definitely goes above 27.12C but I haven’t noticed any problems with it. They recommend a minimum temperature of 59 degrees F but the batteries definitely get colder than that (we had -36F where it is currently in storage a month ago) and there isn’t much I can do about it.
LikeLike
Thank you for your detailed reply. I’m glad to hear you’ve had a good experience with them so far. Your batteries are still newer than mine and you paid less per Ah so you got a really good deal.
The pdf they referred to looks very useful. I wish I could find something that specific for my batteries (but I’m feeling pretty safe with what I did find). It’s strange that it lists an equalization voltage for AGMs.
I agree a temperature probe is a must have. From what I understand, freezing isn’t a problem for fully charged batteries so you’re probably fine. Wow, -36F is definitely cold. ❄️️☃
You might think about adding a donate button to your site. If you’ll email me a Paypal address I’ll buy you that beer. 😃
LikeLike
I’m making a series of videos as I install my solar equipment, to pay forward to the DIY community. Here’s the first segment: https://www.youtube.com/watch?v=zKptqoE1aIs
My goal is to cover all the little details others leave out.
LikeLike
Hi Nik thank you and Bob for the great info. At the end of your column you did invite questions so here goes. I am definitely a DIY kind of guy and am able to figure most things out accept electricity at this level. I bought a 2010 starcraft popup camper with a dead battery. I tend to research quite heavily before spending money and stumbled across this. I now have a better nderstanding of deep cycle batteries and how they differ in relation to charging/drain. My concern before spending hard earned money is the increased tongue weight if i went with dual 6 volt batteries. Im at my max now of being comfortable. In my camper we have a small furnace, fridge, and a few lights with built in fans. We would use a coffee maker and maybe charge a phone. Nothing extensive. Would a group 27 flooded battery , 3 stage charger and a monitor be sufficient? I like the idea of independance and future solar power as money permits. Does any of this make sense? Thanks for your time, Mike
LikeLike
Hi Mike, thanks for stopping by!
If weight is the issue then it’s a hard cap. Pushing weight limits isn’t worth it. You either need to get rid of other heavy things or go with a lithium battery (way more cost but way more Ah/pound). So since you’re looking at about 100Ah of storage, how can you make that go farther?
A solar panel would help (but they also add weight). I’m going to guess your top electricity users are lights, coffee maker and furnace fan. Replace all of the lights with LEDs. Lighting with incandescents is so inefficient so replace them with LEDs and you now can go 5 times longer with the same battery. For the coffee maker, be sure to not leave the hot plate on and maybe think about switching to a french press, they are way more efficient and you can just heat the water once with propane and be done with it. For the furnace, the fan uses more power than you think. We replaced our furnace with a Mr Buddy heater and haven’t regretted it one bit. All of those changes and be aware of your monitor and I’m sure you’ll be fine for a few days even without a panel or any charging. That answer your question?
LikeLike
TR Bowlin has a great video on converting florescent lights to LEDs on youtube. He also has a great vid on reducing black tank smell. Never mind the French press It is just one more thing to mess with. Fill your Mr. Coffee pot with a little bit more water than you need, bring it to a boil on the stove, and pour it through the top of the Mr. Coffee. I have used this system for years. Works great. Pouring is easier if you pour the “pan water” into a measuring cup. BTW- I found a 3qt. Revere Wear stainless pot for $5 at a swap meet. I love it! I have seen many others like it since I got mine. I am working towards putting my solar on the roof.
Regards,
Jack Hall
LikeLike
Thank you Nik
This all sounds good to me and this will be my starting point. I forget about the French press!
Thanks again
Mike
LikeLiked by 1 person
[…] some of our other Solar Panel posts I’ve mentioned Handy Bob Solar as a good resource for people thinking about adding solar […]
LikeLike
[…] the reckless choice […]
LikeLike
Hi Nik, thanks for the great write up, and your others. Was wondering if you are happy with your Everbright solar panels. I’ve been trying to look for reviews and recommendations on solar panels. You, and Handy Bob, seem to go more on price than efficiency, etc. Also, I’m trying to figure out the solar capacity I need. I’m replacing an old solar controller and 2 old flexible panels that just aren’t working any more. I have 2 Deka AGM batteries with a total of 396 Ah capacity. I figure I will use around 40 – 50 Ah on a typical day, and up to 60 – 70 Ah on a max use day. Any thoughts?
Thanks,
Ed
LikeLike
Honestly the everbright panels do everything I ask of them but at the same time I see no reason not to buy panels based on price. I’ve never seen any review that gave a compelling reason to require a particular brand. If the dimensions and ratings are correct for your application and you can get it cheap (including delivery) just go for it. Only thing to look out for is Class C panels as they won’t meet their specifications. Class A and B are guaranteed to be within 5% of their ratings. As for number of panels, lets use 75Ah in case you get a new toy or something that needs more power. 75Ah * 12V = 900Wh. In most of the US, a rule of thumb is that on a sunny day you’ll get 5 hours at around the rating so 900Wh / 5 hours is 180W of panels absolute minimum. Add in 25% losses and a couple cloudy days and you probably want double that or 320W.
The other rule of thumb is based off of battery capacity. Are your batteries 2 6V wired in series? I ask because large 6V batteries are usually around 200-250Ah @ 6V. Then you wire 2 of them in series so you don’t get to add the Ah, you just add the Voltage. 12V batteries usually are in the 100-150Ah range but when you put 2 in parallel you get to add the Ah. If you have 2 12V batteries they’d need to be 198Ah@12V each and gigantic! They would probably weigh 150 pounds each at least. 2 6V batteries at 198Ah is much more common which would give you 198Ah @12V not 396. Either way, another rule of thumb is multiply the Ah@12V number by between 1 and 2 and that’s how many watts of panels you need. Use more like 1 if you only use the system in the summer in the southwest and more like 2 if you go all winter long or spend most of your time in far northern places like Alaska or cloudy places like the PNW. Personally, we have ~530Ah@12V of batteries and 660W of panels and we are completely fine in the summer unless we park under trees, but come November, we just barely keep up in the mountains of Colorado. If we tried to go through December and January on solar, I think we’d either want more panels or a tilting kit.
LikeLike
Thanks! That helps. They are 2 12V AGM batteries wired in parallel. Yes, they are huge and very heavy! Originally, we had Lifeline 4D AGM’s, now have Dekas. They are mounted in a frame/box under the van.
LikeLike
Hi Nik,
I bought 2 Everbright panels. They rate them now at 170W, but say they are more like 175W. I think I’ll be happy with them. Were a little more than what you paid, but still pretty good – $170/panel +$30/panel shipping.
Got another question. My existing wiring is 10AWG from the roof down to the controller, though I’m looking at replacing with 6 or 8AWG unless I go with a MPPT controller. Anyways, my question involves the wiring from the panels. It is 12AWG with MC4 connectors. I was wondering if you added fuses for each panel, or joined the wires together first with MC4 adapters (2 to 1), then added one fuse for all. Of course, it depends on whether I wire in parallel or series. Thanks for any tips you can give me.
Ed
LikeLike
Thanks dear for this amazing post. These are not so expensive items and best to use. But what if the battery dies, at times it can become too expensive.
I personally got started with Battery reconditioning 3 months ago by facing battery issues.
I am sure it will really provide value to anyone using this.
You can check out here https://bitly.com/
LikeLike
Do you have a more detailed wiring diagram?My question is if you are pulling the trailer down the road and you have a 7 pin plug that charges the battery from the car alternator do you disconnect the solar panel system?2nd question can the solar array charge two different types of batteries say a deep cycle lead acid and a Northstar 170 silver type at the same time?
Thanks Gman
LikeLike
I don’t have a wiring diagram besides what you see here unfortunately. For this system in particular, we didn’t connect up to the engine alternator because the batteries are at 24V while the alternator runs at 12V. If your battery system ran at 12V you could set that up with a battery isolator like https://amzn.to/2KARTcr. That makes it so that power can only go _into_ the house batteries and you wont discharge the house batteries to charge the auto battery.
While that is going on, I never disconnect the solar panels. My solar charger works with a battery monitor to know exactly how many joules of energy have gone in from any source. Worst case, your solar controller would automatically go into a different mode that would charge more slowly if power was being added from another source so it _shouldn’t_ hurt anything but read your manual.
LikeLike
Best article I’ve seen for revealing needed info for a diy install! Thanks.
Also retired EE here. The only thing keeping me from pulling the trigger is no vendor has seemed to solve the problem of letting me run my inverter in the RV while boondocking AND allowing me to connect to the grid at home to use the system to save money while RV is in the driveway. We aren’t full timers so I can’t justify the cost for a few weeks use a year.
The main problem is safely having two modes: one with anti-islanding protection and one without. It seems this would be fairly simple with a transfer/cutoff switch and outboard anti-islanding detector. When the RV is plugged into shore power, anti-islanding is enabled. Does anyone make an inverter with two outputs: one anti-islanding and one without? (I think I’m going to send the question to victron. )
LikeLike
So you’re looking for the solar panels on the RV to feed power into the house to save money? The issue is going to be the house wiring, not the RV wiring. The power companies don’t want you feeding power back into the main lines if the utility power goes out because it is a safety hazard for the linemen. The easiest way I would see it would be you’d need the RV to have a Grid-Tie rated inverter big enough for all of the house loads (or whatever house loads were on the sub panel you powered from the RV) that would transfer to battery power if the utility power went out. Then you’d also need a transfer switch that would route the utility power into the house or the RV as needed. Honestly I think you’d be better off just using some extension cords from the RV to whatever you wanted to power in the house.
LikeLike
Yes, I know the issue. The term “anti-islanding” in the solar industry refers to the safety feature you describe.
No, I would not have a grid tie inverter big enough to supply the house because my RV solar would only supply maybe 1KVA max. My house peak requirements might be much more than that occasionally.
If I do this, I will have my utility install net-metering service (another term in the solar industry) where I pay the difference in their supplied power and my supplied power. And I would get the approval of my utility for my solar/inverter installation.
PS: I have found that the Vectron Multi-Plus and Multi-Plus II units may meet some of my requirements. Still researching….
LikeLike
I am also updating an older RV (1999) by adding solar to the existing battery charging system which includes the drive engine alternator, an onboard Onan 5500W genset, and shore power options. These options appear to be isolated from one another with transfer switches. Another complexity is that there is a 12v chassis (starting) battery and a pair of 6v coach batteries which all seem to be receiving charge current from which ever of the charging sources is operating. Two questions arise:
1. Must the newly added solar charging system include an isolation device to remove it from the batteries when one of the other options is operating?
2. All of this information about efficiently charging Pb-acid makes me want to review and revise the current charging systems because they most likely are not of the 3-stage design. Is there a “converter” replacement that provides a programmable charge controller?
LikeLike
I’ve been considering installing solar power into our RV, I’m still hesitant to do it myself, but this was a super helpful article if and when I do. Thanks for sharing.
LikeLike