

This is a tutorial by a sewing-impaired person for other sewing-impaired people. My sewing isn’t that great, and my project design skills are worse. If that sounds like you, join me on a reupholstery adventure, won’t you?
(If you are really good at crafting, you are welcome to read along, but NO JUDGING ALLOWED, okay?)
Our dinette cushions were (1) decorated in the style of 1989 and (2) infiltrated with stale cigarette smoke. Ew.
You can see them in this picture:

You can sorta see that for each side there is one rectangular cushion (where you sit) and one trapezoidal cushion (on the back). I’ll show you the process for the rectangular cushion, which is roughly similar to the process of wrapping a gift.
It was nice to have an indoor project, especially because we got a blizzard the week I started on this project.

Supplies Needed (links included to supplies I used, the same as or as similar as I could find):
- Old cushions to be reupholstered
- Sewing Machine
- Fabric
- Pins and Pin cushion
- Sew-on Velcro
- Cutting mat, grid, and rotary cutter (optional, but it makes cutting this much fabric in a straight line a LOT easier)
- Measuring tape
- Needle and thread for hand-sewing (I used the same thread for both machine- and hand-sewing)
- Chalk or disappearing fabric marker
- Thimble
- Iron and ironing board
- Lots of space! (I used the dining room table)
Step 1: Clean
I actually haven’t done this part yet, but I wish I’d done it at the beginning. Rent a RugDoctor type thing and go to town. It’s important that you keep the old upholstery on for this step or the foam will likely disintegrate! Allow foam to dry. Alternately, you could just replace the foam altogether, but I didn’t do that.
(Update: After sitting on the non-updated foam for 2 months, replacing the foam is definitely on my to-do list. Supposedly fabric places will cut new foam for you.)
Step 2: Remove foam from covers.
That is, remove the old upholstery coverings but hang on to the foam. Our covers zipped off. Other methods have you use the old covers to create a pattern, but that is too advanced for me!
Step 3: Measure around foam.
You need to figure out how much fabric you need. First, measure all the way around the shorter part of the cushion (make sure you include both the front and the back). Add an inch for seam allowances. Then measure all the way around the longer part. Add about 5 inches or so (enough so you have enough fabric to “gift wrap” the edges), plus an inch for seam allowances. Now you know how much fabric you need for each rectangular cushion. I measured again for my trapezoidal cushions, then added everything together. (Sorry I don’t have photos of this step!)
Step 4: Buy fabric.
Make sure your fabric is heavy enough to withstand use as upholstery. If you want to wash your covers, make sure your fabric can handle that, too. We got cotton but I didn’t pre-wash the fabric, so I’ll be sure to hang-dry whenever I choose to wash the finished covers in the future.
This was the first time I’d ever been to JoAnn’s when, after learning what my plans were, they responded, “Oh, that’s a big project!” That made me kinda nervous, not gonna lie.
Iron your fabric before proceeding to the next step.
Step 5: Measure and cut your fabric.
Use the measurements you took in step 3. Measure twice, cut once! The mat, grid, rotary cutter, and chalk are handy here.

Step 6: Sew a “tube.”
Take the cut fabric for one cushion. Fold it in half length-wise (“hot dog style”) with the wrong side facing out. Line up the edges and pin. Hold up to the foam to make sure this is all looking right.
Then, using your sewing machine, sew the tube closed along the long edge (it will still be open on the short edges). I used a zigzag stitch.
Step 7: Trim and Finish edges.
Make sure the short ends are straight across. Trim any “crookedness” away using your grid, mat, and rotary cutter. Heat up your iron while you’re doing this.
Next, finish the short edges. This is to keep the fabric from fraying, to look nicer, and to give you an easier edge to work with in the next step.
To finish the edges, first use an iron to create a pressed fold about 3/8″ from the edge of the tube all the way around. Note that your tube should still be inside out, and you are folding and ironing so the short bit of your seam fabric will eventually be hidden inside the tube once it is turned inside out (see picture below). Repeat on other end.
While the fabric is still pressed, sew a line as close as you can to the edge of the tube all the way around. Repeat on other end.

Step 8: Slide your cover onto the foam.
Turn the finished tube right-side-out and slide it onto your cushion foam.

This might be a little easier with a friend’s help!
Line it up so that you have an equal amount of space on both ends.
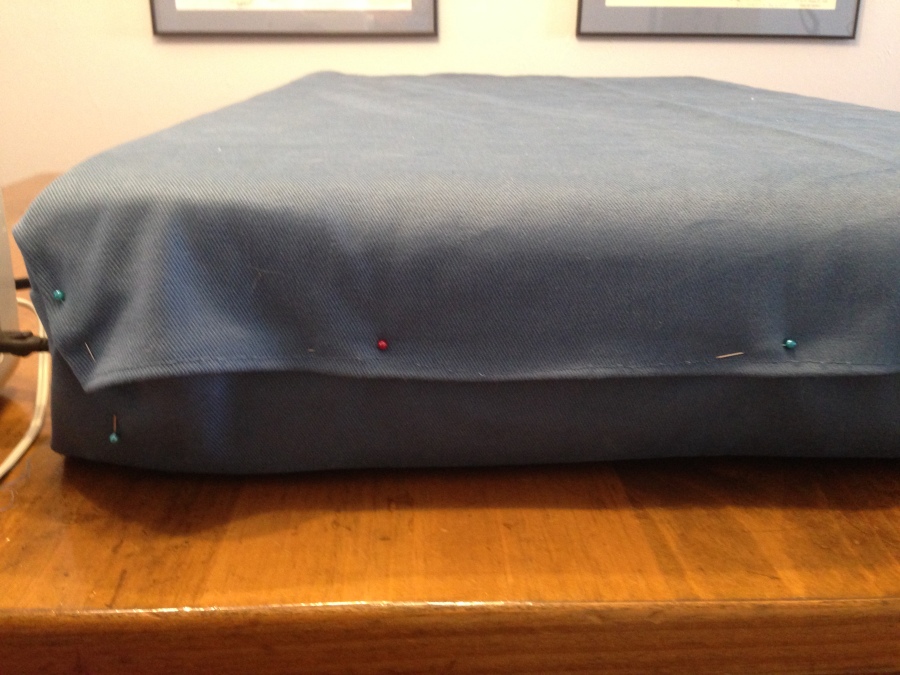
Step 9: Wrap it like a gift!
Tuck in the corners and pin. If you’re not sure what I’m talking about, check out this video at 3:48: Basic Gift Wrap. On the side of your cushion that will be facing the wall, you just need to pin the corners. On the other side, pin all the way across.
Step 10: Hand sew closed one end.
This takes longer than you think. Get your needle and thread and hand sew the corners and edge closed securely on one end. This should be the end that faces out towards the room.

Sew the corners of the other side, but Velcro will go along the edge.
Step 11: Pin Velcro.
Pin Velcro across the other end with hooks on one side and loops on the other.
Step 12: Remove foam again.
Be careful not to pop your corner seams.

Step 13: Sew Velcro.
Use your sewing machine to sew a “box” around each piece of Velcro to attach securely. For at least one side of this, it will probably be easier to sew with the cover inside-out, then turn it back right-side-out when you are finished.
Step 14: Put foam back in.
Sorry.
Step 15: Finished!


Hooray! It’s not perfect (mine is a little loose because I measured before taking the original covers off instead of after), but it’s far better than it was. I’m almost finished with the other rectangular cushion, then it will be on to the more weirdly-shaped ones. I am learning a lot about sewing and I’m slowly but surely improving. One thing I learned: this takes about 5 times longer than I thought it would! Oh well. Progress is progress. 🙂
Now have a seat and enjoy a beverage!
Are you new to our blog? Check out some of our other posts:
How Full-Timing Taught Me Flexibility

Hi there…..I didn’t pay attn. to how long ago you did this, but I doubt this info will help you. I needed to do the same reupholstering(slip covering, really) that you did. I did all the measuring, made essentially pillowcases for each cushion. I sewed across inside corners to make them square. I put on a dry cleaners bag, to make it slip. Then cloth cover. I tucked and pinned like you then diaper pinned the rest. My thinking was at at some point I would need to do this again, so why sweat! You arrived at the same place, with a different map! Thanks for sharing!
LikeLike
You did a great job. So many (or should i say “sew many”) people do not know how to sew. No Home Ec anymore. I really feel it should come back as these young girls and boys too need to have this type of learning. They have no knowledge of keeping up a household. That includes money and budgeting!!
LikeLike
Do you know how yards of fabric you used? I have this exact same set up and bench style.
LikeLike
I’m not sure, unfortunately!
LikeLike